
If you are ready to indulge in something truly special, this Heavenly Coconut Cream Cake Recipe is exactly what your dessert dreams are made of. With its tender, moist layers infused with rich coconut flavors and a luxuriously creamy filling and frosting, this cake delivers the perfect balance of sweetness and tropical flair. Every bite is like a mini vacation, making it a wonderful treat for gatherings or a special weekend indulgence. I can’t wait to take you through this delightful journey of flavors and textures that bring this Heavenly Coconut Cream Cake Recipe to life.
Ingredients You’ll Need
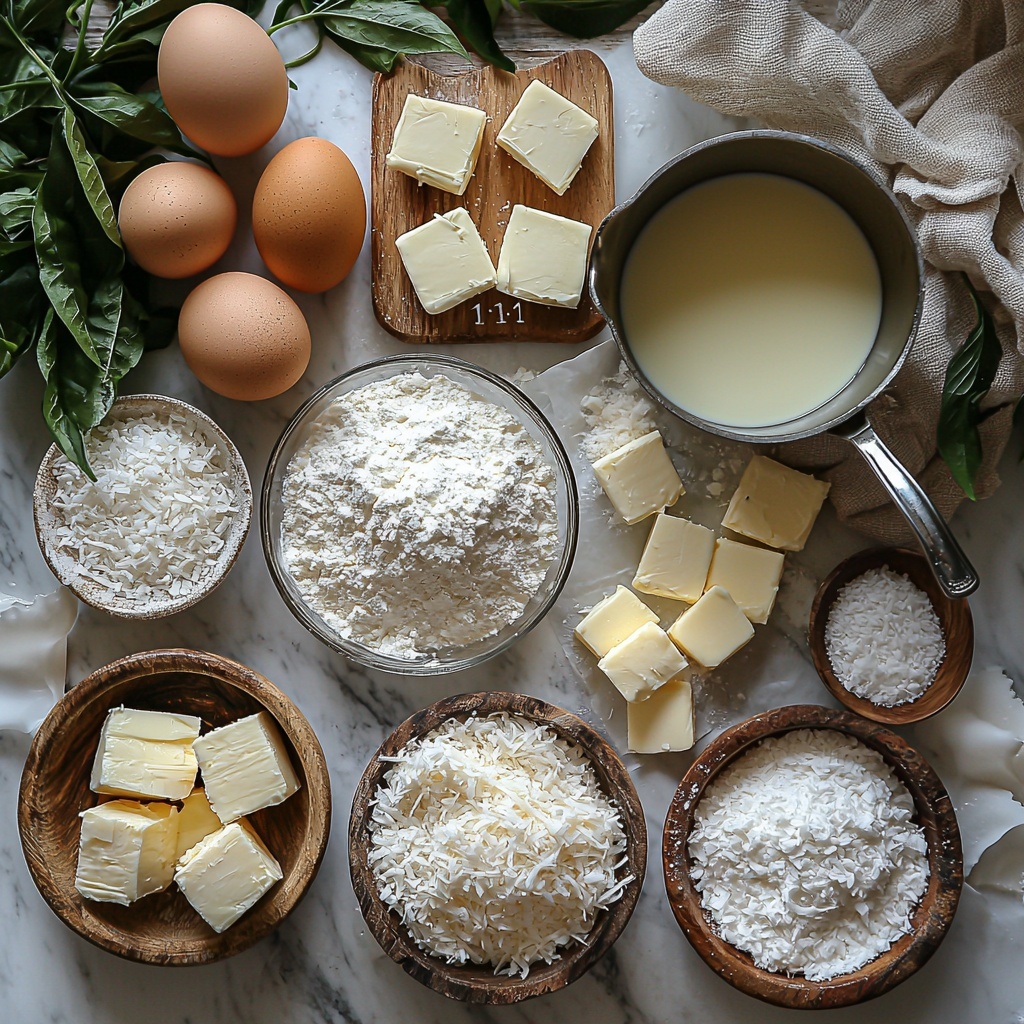
This Heavenly Coconut Cream Cake Recipe relies on a few simple, wholesome ingredients that work harmoniously to create its unforgettable flavor and texture. Each ingredient plays a crucial role in ensuring that the cake is moist, fluffy, and bursting with coconut goodness from the crumb to the frosting.
- All-purpose flour: Provides the perfect structure and a tender crumb for the cake layers.
- Baking powder: Helps the cake rise beautifully and stay light and airy.
- Salt: Enhances the sweetness and balances the flavors perfectly.
- Full-fat coconut milk: Adds rich, creamy coconut flavor and moistness throughout the cake and filling.
- Buttermilk: Offers a slight tanginess that tenderizes the crumb and adds depth to the taste.
- Unsalted butter: Contributes to the cake’s richness and smooth texture.
- Granulated sugar: Sweetens the cake and helps with the caramelization during baking.
- Large eggs: Bind ingredients and provide structure and moisture.
- Pure vanilla extract: Elevates the flavor with its warm, aromatic notes.
- Coconut extract: Intensifies the coconut essence in every bite.
- Whole milk: Works with coconut milk in the filling for creamy indulgence.
- Cornstarch: Thickens the luscious coconut filling.
- Sweetened shredded coconut: Adds texture and extra coconut punch in the filling and for decoration.
- Heavy whipping cream: Whipped to sweet, fluffy perfection for the frosting.
- Powdered sugar: Sweetens and stabilizes the whipped cream frosting.
How to Make Heavenly Coconut Cream Cake Recipe
Step 1: Prepare Your Oven and Pans
Start by preheating your oven to 350°F (175°C) and getting three 8-inch round cake pans ready. Grease and flour them or line with parchment paper to ensure your cakes come out perfectly smooth and easy to remove. This sets the stage for a flawless bake.
Step 2: Mix the Dry Ingredients
Combine the all-purpose flour, baking powder, and salt in a bowl and whisk them together well. This ensures an even distribution of leavening and seasoning, which helps the cake rise evenly and develop its tender crumb.
Step 3: Combine the Milks
In a separate bowl, mix the full-fat coconut milk and buttermilk. This combination provides a lovely balance of richness and slight acidity, enriching the cake’s flavor and texture beautifully.
Step 4: Cream Butter and Sugar
Using a mixer, cream the unsalted butter and granulated sugar until light and fluffy. This process incorporates air into your batter, giving the cake its soft texture. Next, add eggs one at a time, making sure each is incorporated before adding the next, followed by the pure vanilla and coconut extracts to infuse the batter with aromatic sweetness.
Step 5: Alternate Adding Dry Ingredients and Milk Mixture
Add the dry ingredients and the coconut-buttermilk mixture alternately to the creamed butter mixture. Mix gently after each addition just until combined to avoid overworking the batter, which can make the cake dense.
Step 6: Bake the Cake Layers
Divide the batter evenly among the prepared pans and bake for 25 to 28 minutes. Look for a golden color and check doneness with a toothpick—it should come out clean or with a few moist crumbs. Let the cakes cool in the pans for about 10 minutes before transferring them to wire racks.
Step 7: Make the Coconut Cream Filling
Whisk together sugar, cornstarch, and egg yolks in a saucepan. Gradually add the coconut milk and whole milk, stirring constantly over medium heat until the mixture thickens and coats the back of a spoon. Stir in the butter, coconut extract, and shredded coconut, then chill until set. This creamy filling is the heart of our Heavenly Coconut Cream Cake Recipe.
Step 8: Prepare the Whipped Cream Frosting
Whip the heavy cream with powdered sugar until stiff peaks form. Add in vanilla and coconut extracts to complement the cake’s tropical theme. This light and fluffy frosting perfectly balances the rich filling and moist cake layers.
Step 9: Assemble Your Heavenly Coconut Cream Cake Recipe
Layer the cooled cakes with a generous spread of the coconut cream filling in between. Then frost the entire cake with the whipped cream frosting. Finish by pressing sweetened shredded coconut all around the cake for a beautiful, textured decoration that screams coconut celebration.
How to Serve Heavenly Coconut Cream Cake Recipe
Garnishes
Fresh coconut flakes, toasted to a golden crisp, add a delightful crunch and deeper flavor when sprinkled on top. You could also add a few edible flowers or a drizzle of passion fruit glaze to add a pop of color and a hint of tangy brightness, enhancing the cake’s tropical vibe.
Side Dishes
Serving this cake alongside a light tropical fruit salad with pineapple, mango, and kiwi elevates the meal with refreshing contrasts. A dollop of vanilla bean ice cream or a cup of lightly brewed coconut-flavored tea pairs beautifully, balancing the richness with cool, subtle flavors.
Creative Ways to Present
Try serving individual slices with a small spoonful of toasted coconut cream on the side or layering the cake in mini trifle cups with additional whipped cream and diced tropical fruits. These playful presentations are perfect for parties and will keep guests coming back for more.
Make Ahead and Storage
Storing Leftovers
Store any leftover Heavenly Coconut Cream Cake Recipe in an airtight container in the refrigerator for up to 4 days. Keep it chilled to preserve the delicate coconut cream filling and whipped topping. The flavors actually meld beautifully after a day, making it even more delicious.
Freezing
You can freeze the cake layers separately wrapped tightly in plastic wrap and then foil for up to 2 months. Once thawed, prepare the coconut cream filling and whip the frosting fresh for best texture. This way, you always have the base ready for a quick assembly of this show-stopping cake.
Reheating
Since this cake is best served chilled, reheating isn’t usually recommended. If you prefer a slightly warmer slice, let it sit at room temperature for 20 to 30 minutes before serving to soften the frosting without melting it completely.
FAQs
Can I use canned coconut milk for this recipe?
Absolutely! Full-fat canned coconut milk is ideal for achieving that rich flavor and creamy texture essential to the Heavenly Coconut Cream Cake Recipe. Just give it a good shake before measuring.
Is it necessary to use both vanilla and coconut extracts?
Yes, combining vanilla and coconut extracts creates a more complex and aromatic flavor profile that complements the cake’s tropical charm wonderfully.
Can I substitute the buttermilk?
If you don’t have buttermilk, mix 1 tablespoon of lemon juice or white vinegar with enough milk to make 1 cup, let it sit for 5 minutes, and then use. This replicates buttermilk’s acidity needed to tenderize the cake.
What if I want a dairy-free version?
You can use coconut oil instead of butter and coconut cream or a plant-based cream for the filling and frosting. Just be sure to use coconut milk substitutes that are full-fat to keep the cake moist and flavorful.
Can I make this cake gluten-free?
Swapping all-purpose flour for a gluten-free flour blend designed for baking may work, but results can vary. Make sure it includes xanthan gum or a stabilizer to help with texture, so the cake remains light and tender.
Final Thoughts
This Heavenly Coconut Cream Cake Recipe is a true celebration of coconut in every glorious layer and bite. Whether you’re making it for a special occasion or just because you crave something luscious and tropical, it’s bound to delight you and everyone you share it with. So, grab your ingredients, roll up your sleeves, and enjoy the simple magic of baking this unforgettable cake — you’ll be so glad you did!
Print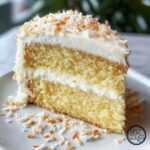
Heavenly Coconut Cream Cake Recipe
- Prep Time: 20 minutes
- Cook Time: 28 minutes
- Total Time: 58 minutes
- Yield: 12 servings
- Category: Dessert
- Method: Baking
- Cuisine: American
- Diet: Vegetarian
Description
A luscious and moist Heavenly Coconut Cream Cake featuring layers of tender coconut-flavored sponge cake, rich coconut milk filling, and fluffy whipped cream frosting, all topped with sweet shredded coconut for a tropical finish.
Ingredients
Cake:
- 2 ½ cups all-purpose flour
- 1 tbsp baking powder
- ½ tsp salt
- 1 cup full-fat coconut milk
- ½ cup buttermilk
- 1 cup unsalted butter
- 2 cups granulated sugar
- 5 large eggs
- 2 tsp pure vanilla extract
- 1 tsp coconut extract
Filling:
- 1 cup full-fat coconut milk
- 1 cup whole milk
- ½ cup granulated sugar
- 3 tbsp cornstarch
- 4 large egg yolks
- 2 tbsp unsalted butter
- ½ tsp coconut extract
- ½ cup sweetened shredded coconut
Frosting:
- 2 cups heavy whipping cream
- ½ cup powdered sugar
- 1 tsp vanilla extract
- ½ tsp coconut extract
Decoration:
- 1 ½ cups sweetened shredded coconut
Instructions
- Preheat and Prepare Pans: Preheat your oven to 350°F (175°C) and grease or line three 8-inch round cake pans to prevent sticking.
- Mix Dry Ingredients: In a bowl, whisk together the all-purpose flour, baking powder, and salt, then set this mixture aside.
- Combine Milk Mixture: In a separate bowl, thoroughly combine the full-fat coconut milk and buttermilk.
- Cream Butter and Sugar: Using a mixer, cream the unsalted butter and granulated sugar until the mixture is light and fluffy. Add eggs one at a time, beating well after each addition, followed by vanilla and coconut extracts.
- Combine Batter: Alternately add the dry ingredient mixture and the milk mixture to the creamed butter mixture, beginning and ending with the dry ingredients. Mix until just combined to avoid overmixing.
- Divide and Bake: Evenly divide the batter among the prepared cake pans and bake in the preheated oven for 25 to 28 minutes, or until a toothpick inserted in the center comes out clean.
- Cool Cakes: Allow the cakes to cool in their pans for 10 minutes before transferring them to wire racks to cool completely.
- Prepare Filling: In a saucepan, whisk together the granulated sugar, cornstarch, and egg yolks. Gradually stir in both the full-fat coconut milk and whole milk. Cook over medium heat, stirring constantly, until the mixture thickens and is smooth.
- Finish Filling: Remove the saucepan from heat and stir in the unsalted butter and coconut extract until fully incorporated. Let the filling chill in the refrigerator until set.
- Whip Frosting: In a mixing bowl, whip the heavy cream with powdered sugar until stiff peaks form. Add vanilla and coconut extracts and continue whipping until well blended.
- Assemble Cake: Place one cake layer on your serving plate. Spread a generous layer of the chilled coconut filling and sprinkle with shredded coconut. Repeat layering with remaining cakes and filling. Frost the entire cake with the whipped cream frosting.
- Decorate: Press or sprinkle the sweetened shredded coconut onto the frosting to decorate the cake edges and top as desired.
Notes
- For best results, use full-fat coconut milk to ensure richness in flavor and texture.
- Make sure the cakes are completely cooled before assembling to prevent melting the filling and frosting.
- You can toast the shredded coconut lightly before decorating for added flavor and texture.
- This cake can be stored covered in the refrigerator for up to 3 days.
- Use room temperature ingredients where possible for smoother batter and better texture.


