
If you’re searching for a crowd-pleaser that’s both charming and absolutely delicious, look no further than this Easy Mini Red Velvet Cakes Recipe. These delightful little treats boast the classic moistness and rich red hue of traditional red velvet, packed into perfectly petite layers that feel like an irresistible bite of celebration. Whether you’re planning a party, craving a fun baking project, or simply want a sweet snack that’s as gorgeous as it is tasty, these easy mini cakes are here to steal the show.
Ingredients You’ll Need
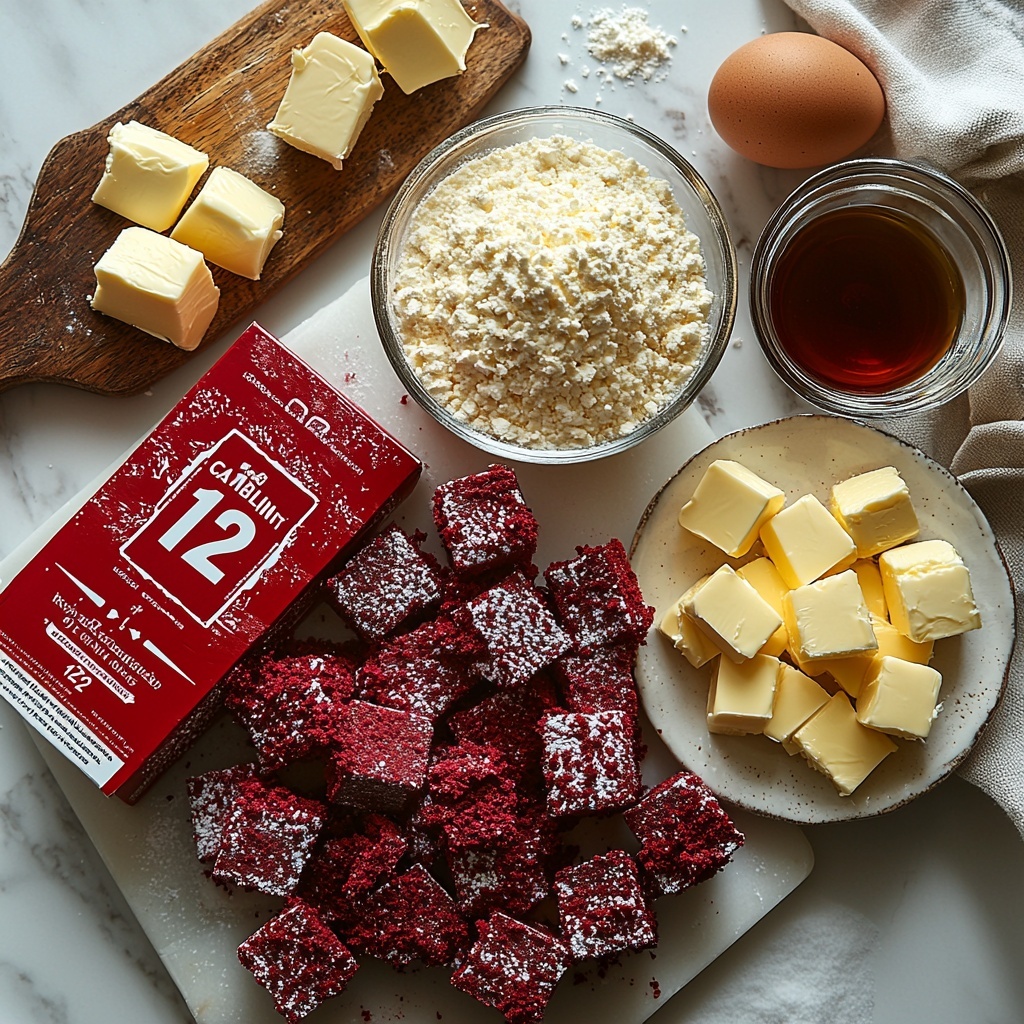
Getting started with these Easy Mini Red Velvet Cakes Recipe is a breeze because the ingredients are straightforward but essential. Each component plays a vital role in delivering the iconic flavor, tender crumb, and creamy frosting that make red velvet a beloved favorite.
- Red velvet cake mix: The base for tender, moist mini cakes with that signature red color and subtle cocoa flavor.
- Water: Hydrates the cake mix to create just the right texture.
- Butter (melted): Adds richness and moisture to the batter for soft cupcakes.
- Eggs: Provide structure and help the cakes rise perfectly.
- Cream cheese (softened): The star ingredient in the frosting, adding tang and creaminess.
- Unsalted butter (softened): Ensures a smooth, luscious frosting texture that’s not too sweet.
- Powdered sugar: Sweetens the frosting while giving it a silky consistency.
- Vanilla extract: Enhances the frosting’s depth with a warm, aromatic note.
How to Make Easy Mini Red Velvet Cakes Recipe
Step 1: Bake the Cupcakes
Start by preparing your cupcakes according to the directions on the red velvet cake mix box. The combination of water, melted butter, and eggs creates a perfectly tender and moist texture. Bake until a toothpick comes out clean—this is your key to knowing the cupcakes are ready. This step is simple but crucial for ensuring those mini cakes have that iconic red velvet crumb.
Step 2: Cool Completely
Once baked, immediately turn the cupcakes out onto a clean surface to cool completely. Patience here pays off because cool cupcakes are far easier to handle and assemble without crumbling. Plus, it keeps your frosting from melting when you layer it.
Step 3: Prepare the Cream Cheese Frosting
While your cupcakes are cooling, beat softened cream cheese in a stand mixer until creamy and smooth. Gradually add the softened butter cubes, mixing until fully incorporated. Slowly add powdered sugar in increments, beating well after each addition to avoid clumps and achieve a perfectly silky frosting. Stir in vanilla extract for that subtle pop of flavor. For easy decorating, scoop your frosting into a piping bag fitted with a Wilton 1M tip or simply use a zip-top bag with a small corner cut off.
Step 4: Assemble the Mini Red Velvet Cakes
Carefully remove the cupcake wrappers, then slice off the rounded tops with a serrated knife—don’t toss these! Cut each cupcake in half horizontally to form layers. Start assembling by placing one cake layer down, piping frosting over it, adding the second layer, more frosting, and then the third. Make sure to finish with a generous mound of frosting on top to make these minis look as appealing as they taste.
Step 5: Garnish Your Mini Cakes
Sprinkle cake crumbs saved from the tops or festive red sprinkles on the frosting to add a pop of color and texture. This final touch turns your mini cakes from simple to standout celebrations on a plate.
How to Serve Easy Mini Red Velvet Cakes Recipe
Garnishes
Adding garnishes is where you get to have some fun and personalize your mini red velvet cakes. Classic red sprinkles bring that extra festive flair, while leftover cake crumbs offer a rustic, homemade vibe. For a more elegant presentation, consider edible gold leaf or finely chopped nuts for contrast.
Side Dishes
These mini cakes make a perfect centerpiece dessert, but you can pair them with fresh berries or a light berry compote to balance the richness. A glass of cold milk or creamy coffee drinks also complements the flavors beautifully, making the whole experience cozy and indulgent.
Creative Ways to Present
Serve your Easy Mini Red Velvet Cakes Recipe on a tiered cake stand to create an eye-catching display, ideal for parties or special occasions. Wrapping individual cakes in parchment with a ribbon adds a personal touch for gifting. You can also serve them in pretty cupcake liners or miniature cake boxes to make each bite feel like a special treat.
Make Ahead and Storage
Storing Leftovers
If you find yourself with extra mini red velvet cakes, store them in an airtight container in the refrigerator to keep the frosting fresh and prevent drying out. They’ll stay delicious for up to 3 days, making them the perfect make-ahead treat for busy schedules.
Freezing
These mini cakes freeze well! Place them in a single layer on a baking sheet and freeze until firm. Then, transfer to a freezer-safe container or bag, separating layers with parchment paper. They keep best for up to 2 months, allowing you to enjoy your Easy Mini Red Velvet Cakes Recipe anytime you want a sweet pick-me-up.
Reheating
To enjoy them thawed, take the cakes out of the freezer and let them sit at room temperature for about an hour. Avoid microwaving to preserve the texture of the frosting and cake layers. If you want a slightly warm cake, pop it in a low oven (about 250°F) for 5-7 minutes, then enjoy!
FAQs
Can I use homemade red velvet cake instead of the box mix?
Absolutely! If you prefer baking from scratch, you can substitute your favorite homemade red velvet cake recipe. Just be sure the cakes are fully cooled before assembling and frosting your mini cakes.
What if I don’t have a piping bag or tip?
No worries! Simply use a sturdy zip-top bag and cut a small corner off the end. You’ll still be able to pipe or spread the frosting neatly onto your mini cakes with minimal fuss.
Can I make these mini cakes dairy-free?
Yes, with some tweaks! Use dairy-free cream cheese and butter substitutes, and check your cake mix ingredients for dairy content. The texture and taste may vary slightly but will still be delightful.
How important is it to remove the cupcake tops?
Removing the tops creates flat layers, which makes it easier to stack the mini cakes with frosting in between. Plus, those cut-off tops are perfect for cake pops or snacking, so nothing goes to waste!
Can I add other flavors to the frosting?
Definitely! A splash of lemon juice or zest can brighten the frosting, or a hint of cocoa powder adds a chocolate twist. Just adjust powdered sugar to maintain your desired thickness and sweetness.
Final Thoughts
There’s something truly special about making and sharing these Easy Mini Red Velvet Cakes Recipe. Their petite size makes every bite feel like a personal celebration, and the classic red velvet flavor combined with luscious cream cheese frosting is an unbeatable combo. I can’t wait for you to try this recipe and watch these little cakes disappear one by one—they’re that good!
Print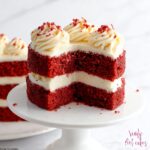
Easy Mini Red Velvet Cakes Recipe
- Prep Time: 5 minutes
- Cook Time: 20-25 minutes
- Total Time: 30-35 minutes
- Yield: 10 mini cakes
- Category: Dessert
- Method: Baking
- Cuisine: American
- Diet: Vegetarian
Description
These Easy Mini Red Velvet Cakes are perfect for any occasion, combining the classic moist red velvet flavor with a rich cream cheese frosting. Made from a simple cake mix and layered with luscious homemade frosting, these bite-sized cakes are visually impressive yet quick to assemble, making them ideal for parties or special treats.
Ingredients
For the Cake:
- 1 box red velvet cake mix
- 1 1/4 cups water
- 1/3 cup butter, melted
- 3 eggs
For the Frosting:
- 16 oz cream cheese, softened
- 2 sticks unsalted butter, softened and cut into 1/2″ cubes
- 3 cups powdered sugar
- 2 tsp vanilla extract
Instructions
- Baking the Cupcakes: Preheat your oven and prepare the red velvet cake batter according to the box instructions, using the water, melted butter, and eggs listed. Pour the batter into cupcake liners and bake until a toothpick inserted into the center comes out clean, about 20-25 minutes depending on your oven.
- Cooling the Cupcakes: Once baked, immediately turn the cupcakes out onto a clean surface and allow them to cool completely to ensure the frosting won’t melt and the layers won’t crumble during assembly.
- Preparing the Frosting: In a stand mixer, beat the softened cream cheese until creamy. Gradually add butter cubes while continuing to beat until well combined and smooth. Slowly add powdered sugar in 1/2 cup increments, mixing thoroughly after each addition. Stir in the vanilla extract. Transfer the frosting to a piping bag fitted with a Wilton 1M tip or a zip-top bag with a small corner cut off for easy application.
- Assembling the Mini Cakes: Carefully remove the cupcake wrappers and trim the domed tops using a serrated knife. Cut each cupcake into halves horizontally. Place one half on your serving plate and pipe frosting evenly over it. Add the second cake layer, frost again, then add the final layer and frost the top generously.
- Garnishing: Finish by garnishing the top with reserved cake crumbs or red sprinkles for a decorative touch.
Notes
- You can save the trimmed cupcake tops to make cake pops or enjoy as snacks.
- Ensure the cupcakes are completely cooled before frosting to prevent melting.
- If you don’t have a piping tip, simply cutting a small corner off the zip bag works well.
- For a firmer frosting, chill it briefly before assembling the cakes.
- These mini cakes can be stored in the refrigerator in an airtight container for up to 3 days.


