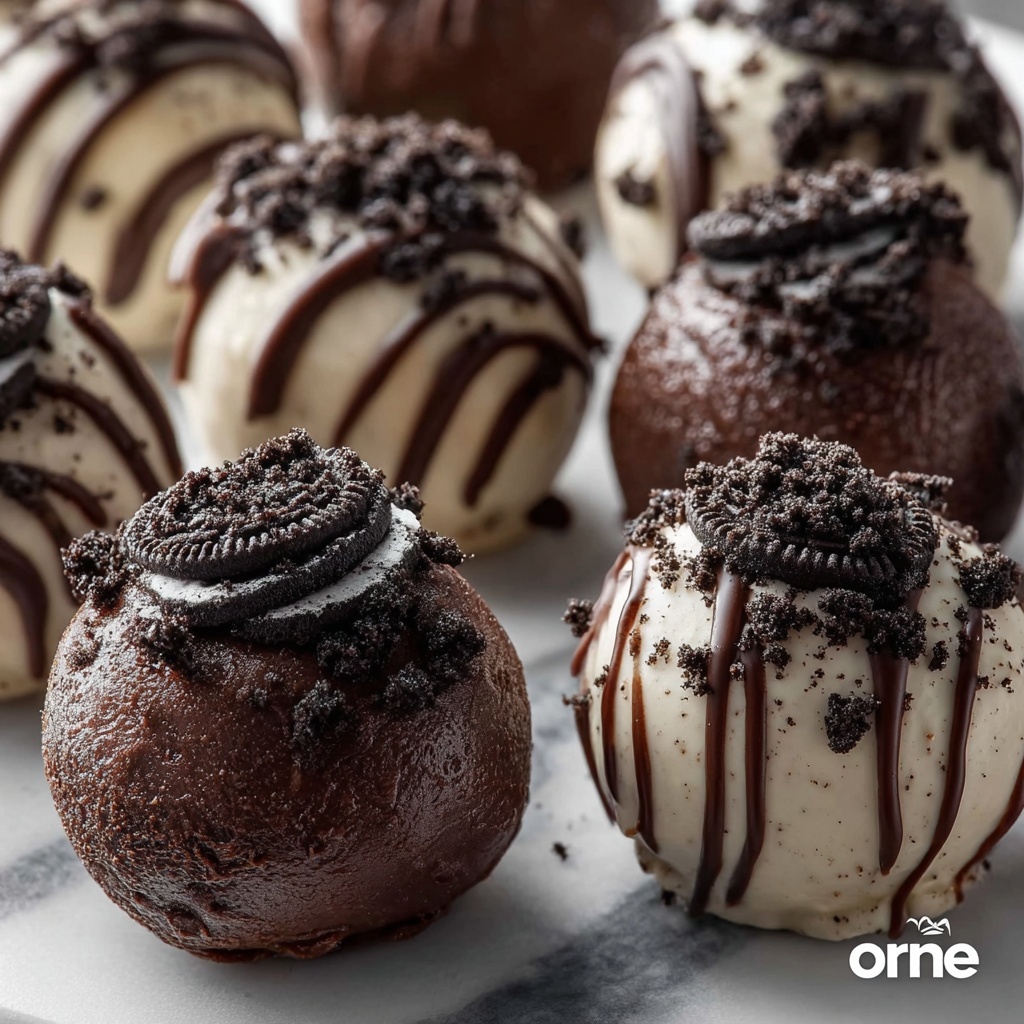
If you have a sweet tooth and appreciate simple desserts that deliver a punch of flavor and fun, this Oreo Balls Recipe is going to be your new best friend. Imagine creamy, tangy cream cheese perfectly blended with finely crushed Oreo cookies, all enveloped in a smooth coat of melted chocolate. These little balls of joy are surprisingly easy to make, yet irresistibly delicious, making them an excellent treat for parties, holidays, or just a cozy night in. Whether you’re a seasoned baker or a beginner, this Oreo Balls Recipe will have you smiling after every bite.
Ingredients You’ll Need
Gathering these ingredients is straightforward, and each one plays an essential role in creating the perfect Oreo Balls Recipe texture and flavor. From the crunch of the cookies to the creaminess of the cheese and the sweet finish of melted chocolate, every element is a star.
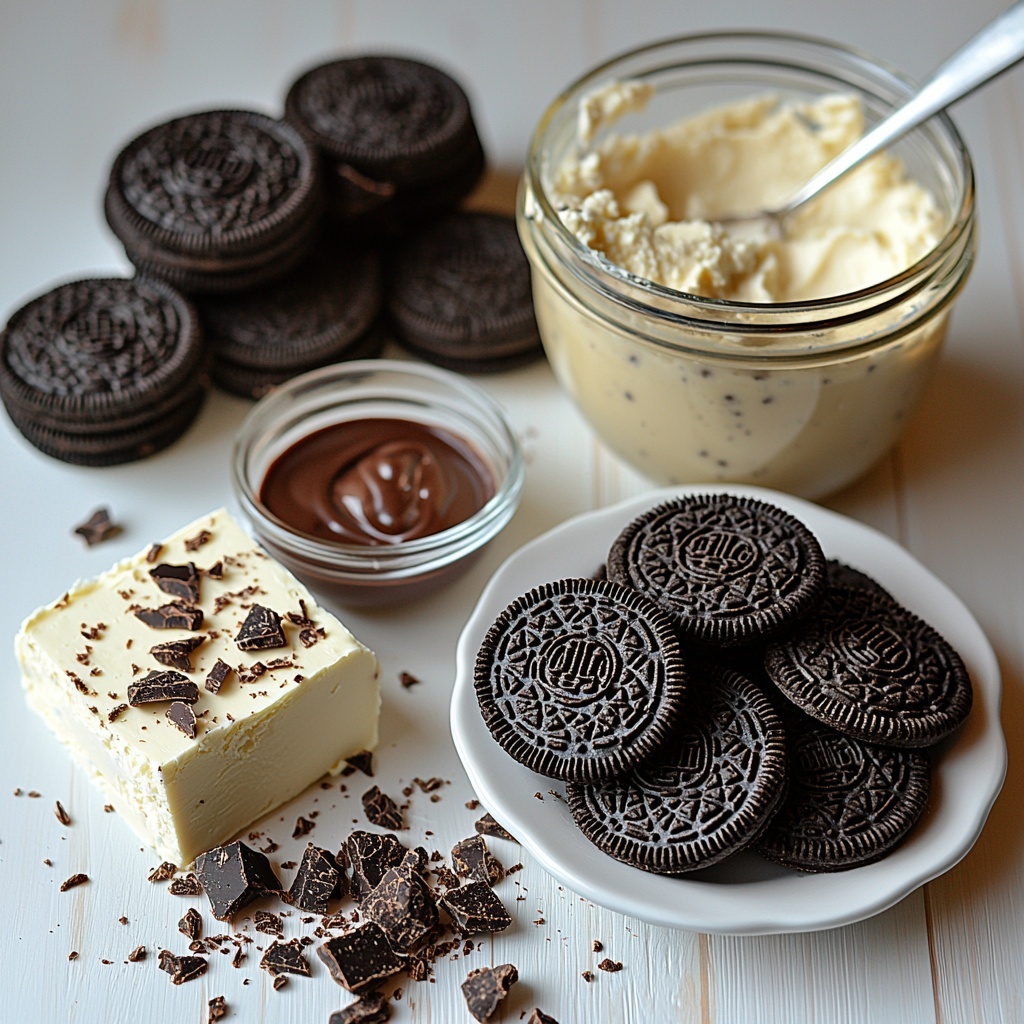
- 36 Oreo cookies: The classic cookie base adds crunch and that unmistakable chocolate-and-cream flavor essential for this dessert.
- 1 (8-ounce) package brick-style cream cheese (softened): This brings smoothness and a slight tang, perfectly balancing the sweetness of the Oreos and chocolate.
- 16 ounces chocolate (semi-sweet, milk, or white): Choose your favorite type of chocolate for coating to customize the sweetness and richness of the finished balls.
How to Make Oreo Balls Recipe
Step 1: Prepare Your Workspace
Start by lining a baking sheet with parchment paper. This simple prep step ensures your Oreo balls won’t stick and makes cleanup a breeze later on.
Step 2: Crush the Oreos
Put the Oreo cookies into a blender or food processor and pulse until you get fine crumbs. Save about 1 to 2 tablespoons of crumbs for sprinkling later, adding an extra touch of Oreo texture on top of your treats.
Step 3: Mix in Cream Cheese
Add the softened cream cheese to your Oreo crumbs, then mix everything together using a handheld mixer. You’ll see the crumbs and cream cheese combine into a smooth, malleable dough that practically begs to be formed into balls.
Step 4: Shape and Chill
Roll the mixture into tablespoon-sized balls and place them evenly on your prepared baking sheet. Pop these into the freezer for at least 20 minutes—that chilling step is key for a firm shape that won’t fall apart during dipping.
Step 5: Melt the Chocolate
While the balls chill, melt your chosen chocolate in a microwave-safe bowl. Heat in short bursts, stirring in between, until the chocolate is perfectly smooth and ready for dipping.
Step 6: Dip the Balls
Take each chilled Oreo ball and dip it fully into the melted chocolate. After coating, place them back on the baking sheet. For a little extra flair and crunch, sprinkle the reserved Oreo crumbs over the top before the chocolate sets.
Step 7: Final Chill
Return your dipped Oreo balls to the refrigerator for another 20 minutes or until the chocolate coating hardens. This final chill helps lock everything in place so each bite is neat and satisfying.
How to Serve Oreo Balls Recipe
Garnishes
Feel free to get creative with garnishes! A sprinkle of crushed Oreos, a drizzle of contrasting chocolate, festive sprinkles, or even chopped nuts can elevate the presentation and add delightful textures that surprise with each bite.
Side Dishes
These Oreo balls shine on their own but they pair beautifully with a scoop of vanilla ice cream or alongside a hot cup of coffee or milk for dipping. Their rich chocolate and creamy texture complement many dessert favorites, making them a crowd-pleaser no matter the company.
Creative Ways to Present
Make your Oreo balls the star of the party by displaying them on decorative trays or arranging them in a cupcake liner bouquet. You can even stick a few on skewers for easy pick-up or pack them in gift boxes for a sweet, homemade present.
Make Ahead and Storage
Storing Leftovers
Keep any leftovers in an airtight container in the refrigerator. The Oreo balls maintain their flavor and texture well and can stay fresh for up to a week, making them perfect for enjoying a little treat over time.
Freezing
Oreo balls freeze beautifully! Place them on a baking sheet to freeze individually before transferring to a freezer-safe container. Frozen, they can last up to two months. When ready to enjoy, just thaw in the fridge for a few hours.
Reheating
Because Oreo balls are best served chilled, reheating isn’t necessary. If you want the chocolate softer, allow them to sit at room temperature for about 10 minutes before serving, but keep in mind the creamy interior is at its best when cool.
FAQs
Can I use a different type of cookie instead of Oreos?
Absolutely! While Oreos offer that iconic flavor, you can experiment with other sandwich cookies or even crushed chocolate chip cookies to switch up the taste and texture.
Is it necessary to use brick-style cream cheese?
Using brick-style cream cheese helps achieve the right texture and firmness of the mixture, but softened regular cream cheese will also work fine as long as it’s at room temperature for easy mixing.
What’s the best chocolate for coating?
Semi-sweet chocolate is a crowd favorite because it balances sweetness well. However, milk or white chocolate works just as wonderfully if you prefer a sweeter or creamier coating.
Can I add flavors to the Oreo mixture?
Definitely! Adding a splash of vanilla extract, a pinch of cinnamon, or even a few drops of mint extract can infuse extra personality into your Oreo Balls Recipe, making them uniquely yours.
Do I need special equipment to make Oreo balls?
Nope! A blender or food processor is handy for crushing Oreos fast, but you can also use a rolling pin and plastic bag. A handheld mixer makes mixing easier, though you can mix by hand with a sturdy spoon if needed.
Final Thoughts
There’s something truly magical about a dessert that combines ease and incredible taste, and this Oreo Balls Recipe fits that bill perfectly. Whether you make them for yourself, family, or friends, they never fail to bring smiles and a little sweet joy. So grab those Oreos and cream cheese, and dive into this simple, delightful recipe that’s sure to become a favorite in your dessert lineup!
Print
Oreo Balls Recipe
- Prep Time: 15 minutes
- Cook Time: 10 minutes
- Total Time: 45 minutes
- Yield: 24 servings
- Category: Dessert
- Method: No-Cook
- Cuisine: American
Description
Delicious and easy-to-make Oreo Balls featuring crushed Oreo cookies mixed with creamy softened cream cheese, coated in melted chocolate, and chilled to perfection. These bite-sized treats are perfect for parties, holidays, or any sweet craving.
Ingredients
Oreo Balls
- 36 Oreo cookies
- 1 (8-ounce) package brick-style cream cheese, softened
Chocolate Coating
- 16 ounces chocolate (semi-sweet, milk, or white), for melting
Instructions
- Prepare Baking Sheet: Line a baking sheet with parchment paper to prevent sticking and make cleanup easy.
- Crush Oreos: Using a blender or food processor, crush the Oreo cookies into fine crumbs. Transfer the crumbs to a mixing bowl and reserve 1-2 tablespoons for sprinkling later.
- Mix Cream Cheese: Add softened cream cheese to the Oreo crumbs. Using a handheld mixer, blend the mixture until fully combined into a smooth, uniform dough.
- Form Balls: Scoop tablespoon-sized portions of the mixture and roll them into balls with your hands. Place the balls on the prepared baking sheet. Freeze them for at least 20 minutes to firm up.
- Melt Chocolate: Melt the chocolate in a microwave-safe bowl by heating in short intervals, stirring frequently, until smooth and fully melted.
- Coat Oreo Balls: Dip each frozen Oreo ball into the melted chocolate, ensuring it is fully covered. Place them back on the baking sheet. For extra garnish, sprinkle the reserved Oreo crumbs on top while the chocolate is still wet.
- Chill to Set: Refrigerate the coated balls for at least 20 minutes to allow the chocolate to harden before serving.
Notes
- Use any type of chocolate you prefer: semi-sweet, milk, or white chocolate.
- Ensure the cream cheese is softened for easier mixing.
- Freezing the balls before dipping helps them hold their shape and makes coating easier.
- Store the Oreo balls in the refrigerator to keep them firm and fresh.


