
If you’ve ever dreamed of making bakery-quality bread right in your own kitchen, this Crusty Italian Bread Recipe is just the ticket. It’s all about that perfect golden crust paired with a soft, chewy interior that will have you slicing and savoring every last crumb. With simple ingredients and a straightforward method, this recipe brings the heart and soul of Italy’s beloved bread traditions straight to your countertop. Trust me, once you taste this bread, you’ll wonder why you ever settled for store-bought!
Ingredients You’ll Need
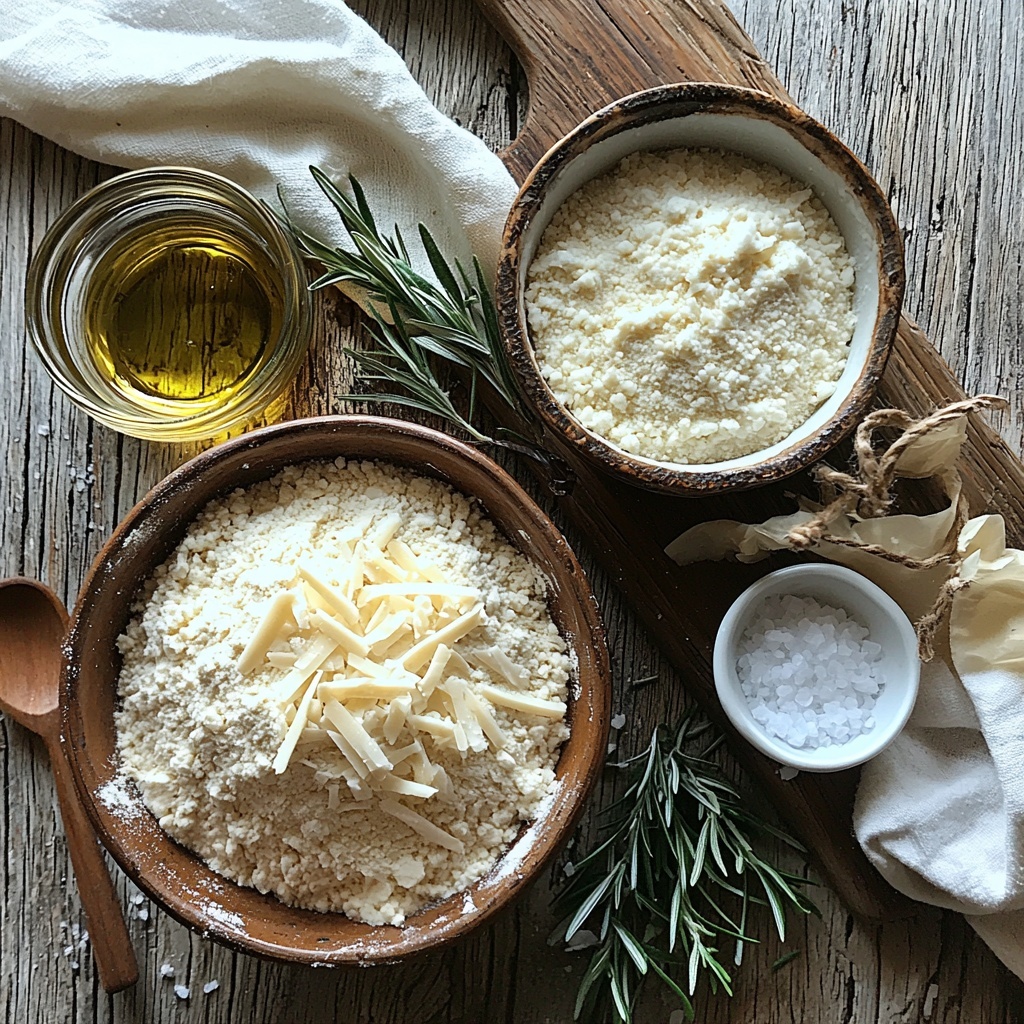
Creating incredible homemade bread doesn’t require a pantry full of rare ingredients. Each item here plays a crucial role in developing the bread’s texture, flavor, and crusty finish.
- 3 ½ cups bread flour: The star of the show, bread flour gives your loaf structure and chewiness thanks to its high protein content.
- 1 ½ teaspoons instant yeast: This magical ingredient helps your dough rise beautifully with minimal fuss.
- 1 ½ teaspoons salt: Essential for balancing flavor and controlling yeast activity.
- 1 ½ cups warm water: Hydrates the flour and activates the yeast for that perfect dough consistency.
- 1 tablespoon olive oil (optional): Adds subtle richness and helps keep the crust tender.
- 1 teaspoon fresh rosemary or fennel seeds (optional for topping): A fragrant finishing touch that adds a burst of aromatic flavor.
How to Make Crusty Italian Bread Recipe
Step 1: Mix the Dry Ingredients
Start by combining the bread flour, instant yeast, and salt in a large bowl. These dry ingredients set the foundation for your dough’s flavor and texture, so mixing them well ensures an even rise and perfect crumb.
Step 2: Add Water and Olive Oil
Slowly pour in the warm water while stirring to bring the dough together into a shaggy mass. If you opt to use olive oil, add it here to lend moisture and a subtle richness that enhances the final loaf.
Step 3: Let the Dough Rest Overnight
Cover your bowl with plastic wrap and leave the dough at room temperature for 12 to 18 hours. This extended fermentation period is the secret behind the complex flavors and wonderfully light interior of your loaf.
Step 4: Shape the Loaf
Once your dough has risen and is full of air bubbles, gently turn it out onto a floured surface. Handle it with care and shape it into a neat round loaf without knocking out all the air bubbles you’ve worked so hard to create.
Step 5: Second Rise
Place the shaped dough on parchment paper, cover it with a clean towel, and let it rise for another 1 to 2 hours. This final proof makes sure your bread will puff up beautifully in the oven.
Step 6: Preheat Your Oven and Dutch Oven
Set your oven to 450°F (230°C) and place your Dutch oven inside to heat for at least 30 minutes. Preheating the vessel creates the perfect steam environment your bread needs to develop a signature crusty exterior.
Step 7: Transfer Dough to Dutch Oven
Carefully lift the dough using the parchment paper and place it into your hot Dutch oven. The parchment makes the transfer easy and prevents sticking.
Step 8: Bake Covered
Pop the lid on and bake for 30 minutes. The steam trapped inside keeps the crust soft allowing the bread to rise fully before the crust sets.
Step 9: Bake Uncovered
Remove the lid and bake for an additional 10 to 15 minutes. This step crisps up the crust to that perfect golden brown you’re aiming for.
Step 10: Cool Before Slicing
Let your loaf cool completely on a wire rack. This allows the interior to finish setting and makes slicing much easier without squashing your perfect bread.
How to Serve Crusty Italian Bread Recipe
Garnishes
Fresh herbs like rosemary or a sprinkle of coarse sea salt right after baking can elevate your bread’s aroma and flavor beautifully. You can also brush the crust with a little olive oil for an extra sheen and subtle taste boost.
Side Dishes
This versatile Crusty Italian Bread Recipe pairs wonderfully with olive oil and balsamic vinegar for dipping, rustic soups, hearty stews, or as an accompaniment to antipasto platters. Its sturdy crust is perfect for mopping up sauces and spreads.
Creative Ways to Present
Turn your loaf into charming mini sandwiches with prosciutto and fresh mozzarella, or slice thick for a rustic bruschetta topped with tomatoes, garlic, and basil. You could even hollow out the center for a delicious bread bowl filled with creamy pasta or chili.
Make Ahead and Storage
Storing Leftovers
To keep your bread fresh, store it in a paper bag or wrapped loosely in a clean kitchen towel at room temperature. This helps maintain the crust’s crispness while preventing the bread from drying out too quickly.
Freezing
If you want to hold onto your bread for longer, slice it and place the pieces in an airtight freezer bag. When frozen, your Crusty Italian Bread Recipe will keep its flavor and texture well for up to 3 months.
Reheating
For that fresh-from-the-oven taste, reheat slices in a toaster or oven at 350°F (175°C) for about 10 minutes. For whole loaves, sprinkle lightly with water, cover with foil, and warm for 10 to 15 minutes to revive the crust and softness.
FAQs
Can I use all-purpose flour instead of bread flour?
While bread flour is preferred for its higher protein, which creates a chewier texture and better rise, you can use all-purpose flour in a pinch. Just expect a slightly less chewy crumb and a softer crust.
Do I have to use a Dutch oven?
A Dutch oven helps trap steam for a crusty exterior, but if you don’t have one, you can bake on a preheated baking stone and add a pan of water in the oven to create steam. It won’t be quite the same, but still delicious!
Can I add other herbs or toppings?
Absolutely! Rosemary and fennel seeds are classic, but feel free to experiment with garlic powder, oregano, or even sesame seeds for a personalized touch.
Why does the dough need to rest for so long?
The long fermentation allows natural flavors to develop and the dough to become light and airy. It also makes the bread easier to digest and gives you that authentic rustic taste.
How do I know when the bread is fully baked?
Look for a deeply golden crust and a hollow sound when you tap the bottom of the loaf. An internal temperature of about 200°F (93°C) also indicates the bread is perfectly baked.
Final Thoughts
Making this Crusty Italian Bread Recipe is one of those joyful kitchen adventures that pays off in delicious, warm slices full of character and comfort. Once you master this loaf, you’ll have a go-to recipe that feels special yet wonderfully achievable. So grab your ingredients, embrace the process, and get ready to fill your home with the irresistible aroma of freshly baked Italian bread.
Print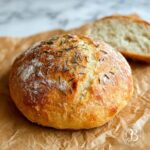
Crusty Italian Bread Recipe
- Prep Time: 10 minutes
- Cook Time: 45 minutes
- Total Time: 13 to 18 hours 55 minutes
- Yield: 1 large loaf
- Category: Bread
- Method: Baking
- Cuisine: Italian
Description
This Crusty Italian Bread recipe yields a rustic, golden loaf with a perfectly crunchy crust and airy interior. Made with simple ingredients and a long fermentation process, this bread develops rich flavors and a satisfying texture. Perfect for sandwiches, dipping, or enjoying plain with olive oil.
Ingredients
Dry Ingredients
- 3 ½ cups bread flour
- 1 ½ teaspoons instant yeast
- 1 ½ teaspoons salt
Wet Ingredients
- 1 ½ cups warm water
- 1 tablespoon olive oil (optional)
Topping (Optional)
- 1 teaspoon fresh rosemary or fennel seeds
Instructions
- Mix Dry Ingredients: In a large bowl, combine the bread flour, instant yeast, and salt thoroughly to create an even mixture.
- Add Water and Oil: Gradually pour in the warm water while stirring to form a shaggy dough. Add olive oil if using, mixing it evenly into the dough.
- First Rest: Cover the bowl tightly with plastic wrap and allow the dough to rest at room temperature for 12 to 18 hours to ferment and develop flavor.
- Shape Dough: Turn the risen dough onto a floured surface and gently shape it into a round loaf, taking care not to deflate it too much.
- Second Rise: Place the shaped dough on parchment paper, cover it with a clean towel, and let it rise for another 1 to 2 hours until puffed.
- Preheat Dutch Oven: Meanwhile, preheat your oven to 450°F (230°C) and place a Dutch oven inside for at least 30 minutes to become very hot.
- Transfer Dough to Dutch Oven: Carefully lift the dough along with the parchment paper and place it into the preheated Dutch oven.
- Bake Covered: Cover with the lid and bake for 30 minutes to trap steam and help develop a crispy crust.
- Bake Uncovered: Remove the lid and bake an additional 10 to 15 minutes until the crust has turned a rich golden brown color.
- Cool Bread: Remove the bread from the oven and transfer it to a wire rack. Allow it to cool completely before slicing and serving to preserve the crust’s crispness.
Notes
- For best results, use bread flour for optimal gluten development and crust texture.
- The long fermentation at room temperature enhances flavor—avoid rushing this step.
- Using a Dutch oven helps create steam, crucial for the crusty exterior.
- Adding olive oil is optional but contributes subtle richness and softness to the crumb.
- Optional toppings like fresh rosemary or fennel seeds add an aromatic touch.
- Allow bread to cool completely before slicing; cutting too early can make the bread gummy.


