Description
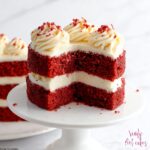
These Easy Mini Red Velvet Cakes are perfect for any occasion, combining the classic moist red velvet flavor with a rich cream cheese frosting. Made from a simple cake mix and layered with luscious homemade frosting, these bite-sized cakes are visually impressive yet quick to assemble, making them ideal for parties or special treats.
Ingredients
Scale
For the Cake:
- 1 box red velvet cake mix
- 1 1/4 cups water
- 1/3 cup butter, melted
- 3 eggs
For the Frosting:
- 16 oz cream cheese, softened
- 2 sticks unsalted butter, softened and cut into 1/2″ cubes
- 3 cups powdered sugar
- 2 tsp vanilla extract
Instructions
- Baking the Cupcakes: Preheat your oven and prepare the red velvet cake batter according to the box instructions, using the water, melted butter, and eggs listed. Pour the batter into cupcake liners and bake until a toothpick inserted into the center comes out clean, about 20-25 minutes depending on your oven.
- Cooling the Cupcakes: Once baked, immediately turn the cupcakes out onto a clean surface and allow them to cool completely to ensure the frosting won’t melt and the layers won’t crumble during assembly.
- Preparing the Frosting: In a stand mixer, beat the softened cream cheese until creamy. Gradually add butter cubes while continuing to beat until well combined and smooth. Slowly add powdered sugar in 1/2 cup increments, mixing thoroughly after each addition. Stir in the vanilla extract. Transfer the frosting to a piping bag fitted with a Wilton 1M tip or a zip-top bag with a small corner cut off for easy application.
- Assembling the Mini Cakes: Carefully remove the cupcake wrappers and trim the domed tops using a serrated knife. Cut each cupcake into halves horizontally. Place one half on your serving plate and pipe frosting evenly over it. Add the second cake layer, frost again, then add the final layer and frost the top generously.
- Garnishing: Finish by garnishing the top with reserved cake crumbs or red sprinkles for a decorative touch.
Notes
- You can save the trimmed cupcake tops to make cake pops or enjoy as snacks.
- Ensure the cupcakes are completely cooled before frosting to prevent melting.
- If you don’t have a piping tip, simply cutting a small corner off the zip bag works well.
- For a firmer frosting, chill it briefly before assembling the cakes.
- These mini cakes can be stored in the refrigerator in an airtight container for up to 3 days.